Pages are not cached or optimizations are not working
By default, WP Rocket delivers cached and optimized pages for visitors, unless you’re visiting:
- Pages as a logged-in user, in which case you should enable User Cache, log out of WordPress or visit the site using an incognito window.
- Pages with query strings in their URLs (Example: yourdomain.com/?your-query-string), for which you’d need to visit the pages without any query strings or use the Cache Query String(s) option.
- Cart, Checkout, and My Account pages from these ecommerce plugins.
- A page for the first time, and a plugin with mandatory cookie compatibility is enabled. Once the mandatory cookie is set, WP Rocket will serve the cache in subsequent visits.
If you are on a managed WordPress host, page caching itself may be disabled by design. Please check our hosting article for host-specific notes. Other optimizations should still be applied, and the below tips will still help.
If you believe that WP Rocket is not caching your pages or is not optimizing your files outside the scenarios above, it might be that the minimum requirements for the plugin to function have not been met. Or it could be that you have previously installed other caching plugins, and even if you deleted them via the WordPress dashboard, they have left files and configuration behind.
In this article
Writing permissions
In order to function correctly, WP Rocket needs be able to create and write to certain files and folders within your WordPress install. The following files and folders are associated with, or written to by WP Rocket:
{wordpress root folder}
┣━.htaccess
┣━wp-config.php
┗━wp-content
  ┣━advanced-cache.php
  ┣━cache
  ┃ ┣━busting
  ┃ ┣━critical-css
  ┃ ┣━used-css
  ┃ ┣━background-css
  ┃ ┣━min
  ┃ ┗━wp-rocket
  ┗━wp-rocket-config<br>
.htaccess
{wordpress root folder}
┗━.htaccess
On Apache/LiteSpeed servers, the .htaccess file needs to be writable for WP Rocket (CHMOD 0644). After activation there should be a large block of code present from WP Rocket, beginning at the very top of the file:
# BEGIN WP Rocket v{version number}

... lots of code in here ...

# END WP Rocket

... other code down here
Note that an htaccess file is not required for caching and file optimizations to work. But it is used to apply other best practices such as browser caching and GZIP compressions.
wp-config.php
{wordpress root folder}
┗━wp-config.php
The wp-config.php file needs to be writable for WP Rocket (CHMOD 0644). Make sure that the following line is present at the top of wp-config.php, after the opening <?php tag. If it is too far down in the file, WP Rocket will not work!
define( 'WP_CACHE', true ); // Added by WP Rocket
Also, make sure there is no reference to another caching plugin. For example, WP Super Cache leaves this line behind:
define( 'WPCACHEHOME', '{/path/to/wordpress/root/}wp-content/plugins/wp-super-cache/' ); //Added by WP-Cache Manager
advanced-cache.php
{wordpress root folder}
┗━wp-content
  ┗━advanced-cache.php
Make sure that advanced-cache.php in the wp-content folder references only WP Rocket.
WP Rocket configuration folder
{wordpress root folder}
┗━wp-content
  ┗━wp-rocket-config
Make sure a folder named wp-rocket-config is present in wp-content. If it isn’t, create it, and make sure WP Rocket can write to it.
Cache folder (and subfolders)
{wordpress root folder}
┗━wp-content
  ┗━cache
    ┣━busting
    ┣━critical-css
    ┣━used-css
    ┣━background-css
    ┣━min
    ┗━wp-rocket
Make sure that WP Rocket has writing permissions for the cache folder (CHMOD 0755), and that it contains the subfolders depicted above. All of these WP Rocket needs to be able to write to. If these folders don’t exist you should create them manually.
Cleaning up the cache folder
If you had any other caching plugin previously enabled, it may have left behind its own folders. We recommend to delete those.
WP Super Cache creates a wp-cache-config.php file in wp-content which should be deleted.
W3 Total Cache creates the following files and folders in wp-content which should be deleted:
wp-content         (keep!)
┣━cache            (keep!)
┃ ┣━config         (delete)
┃ ┣━db             (delete)
┃ ┣━minify         (delete)
┃ ┣━object         (delete)
┃ ┗━page_enhanced  (delete)
┣━db.php           (delete)
┣━object-cache.php (delete)
┗━w3tc-config      (delete)
(It may create other folders based on individual settings.)
Note: While it’s fine to delete any files and folders of caching plugins you don’t use anymore, even some themes may create a subfolder in the cache folder. You should always keep those.
WP Rocket Settings
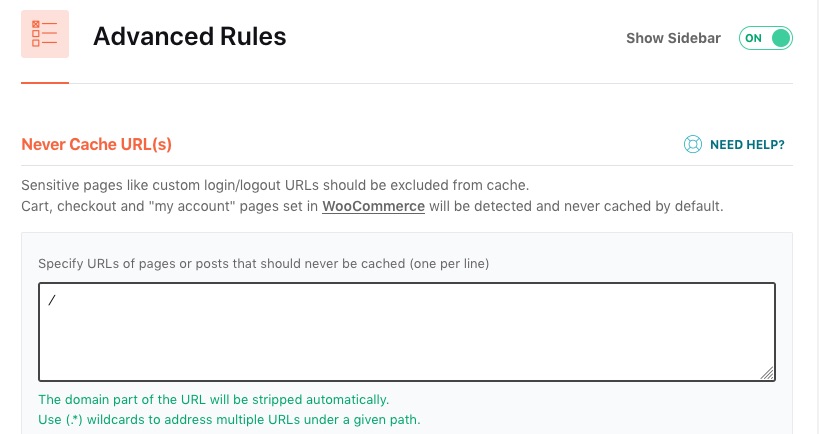
- Go to WP Rocket Settings > Advanced Rules > Never Cache URLs
Make sure there aren't any unexpected exclusions. For example,/will exclude the homepage from being optimized: - Settings can be controlled on a page-by-page basis as well. Go to the edit screen of an affected page and check the WP Rocket Options box at the side. Check if the page has been excluded, or if certain options have been deactivated:


Multisite and domain mapping
If you have a multisite installation using domain mapping, try logging into your admin area using the mapped domain instead of the original domain, and then de-activate and re-activate WP Rocket. This will enable WP Rocket to detect the correct domain and activate caching.
Changing domains and migrating sites
When you change the domain for your site, enable HTTPS, change the primary version of your domain from www to non-www (or vice versa) or move a site from a development URL to a live URL, the WP Rocket configuration must be updated to match.
Deactivate and reactivate WP Rocket in its new location, or after making any changes to your domain, so that the configuration file can be updated correctly.
In most of case, this should be all that is required.
More details in this article: Changing Domains and Migrating Sites with WP Rocket
Other plugins/theme disabling caching
Sometimes another plugin or your theme may set the constant DONOTCACHEPAGE. What this does is override all caching plugins by blocking caching from working. So this would need to be removed and the developer of that plugin informed.
You can see if the constant is what’s causing cache problems by installing this helper plugin which will allow WP Rocket to apply caching even if the DONOTCACHEPAGE constant has been defined somewhere else:
📥 Download (.zip): WP Rocket | Force Page Caching
Developers: You can find the code for this plugin on GitHub.
Please check this list for all the plugins/themes we are aware of that prevent caching and/or optimizations:
Plugins and themes not compatible with WP Rocket
SSL cache
SSL caching is automatically enabled on WP Rocket.
On existing installations that don't currently use SSL but enable it later on, make sure you update your WordPress URL settings to use HTTPS and WP Rocket will automatically enable SSL caching.
See this article for more info:
Using SSL with WP Rocket
Theme compatibility
- Make sure your theme contains a closing html tag:
</html> - Make sure your current theme references
wp_footer(). - If it is missing, adding it to the footer.php template, right before the closing
</body>tag, usually resolves the issue:

After making any of these adjustments, de-activate and re-activate WP Rocket once. Then verify if WP Rocket is working by following this article:
How to check if WP Rocket is caching your pages
Permalinks requirements
- WP Rocket doesn't work with default permalinks. It's necessary to have custom permalinks of the type
http://example.com/my-post/rather thanhttp://example.com/?p=1234. - URLs that have
.php,.xmland.xslextensions are excluded from caching. - Trailing slash configuration: WP Rocket will use the Permalinks settings to determine whether the trailing slash or non-trailing slash version of the URL will be cached:


Other server requirements
mod_expireandmod_deflateshould be enabled for browser caching and GZIP compression respectively (ask your webhost to enable these)
Temporary domains
Caching won't work on temporary domains which contains a tilde ~, e.g. http://example.com/~temp.
Category pages are not cached
Some category or taxonomy pages may not be cached when their paths have been manipulated by plugins or rewrite rules. To try and resolve this, install and activate the following helper plugin (be sure to use version 3.19.2 and above):
📥 Download (.zip): WP Rocket | Disable URL Validation
Developers: You can find the code for this plugin on GitHub.