How to check if WP Rocket is caching and optimizing your site
By default, and right upon activation, WP Rocket caches the pages of your site, and starts applying the automatic features.
With the information in this article, you can check if WP Rocket is caching and optimizing your site as expected.
Firstly, make sure one of the following conditions is true:
- Either: You’re logged out, so you’re just an anonymous visitor to your WordPress site.
- Or: You’ve enabled User Cache, so WP Rocket will create a dedicated cache for logged-in users on your site.
Then, use the following methods to check if a page is really cached and optimized.
Caching footprint
Open the browser’s source view of the page and scroll to the bottom. At the very end, you should see an entry like this:
This website is like a Rocket, isn't it? Performance optimized by WP Rocket. Learn more: https://wp-rocket.me - Debug: cached@1730272532

At the end of the footprint, the string with numbers is called the timestamp. The timestamp says the exact time when the cache file was created, and it uses the UNIX timestamp format.
In some scenarios, the caching footprint will be present but without the timestamp.
This website is like a Rocket, isn't it? Performance optimized by WP Rocket. Learn more: https ://wp-rocket.me

This will happen when:
- WP Rocket's page caching is deactivated:
- Manually, with the helper plugin.
- Or, automatically, if you are on a managed WordPress host that handles their own page caching. Please check our hosting article for host-specific notes.
- The visited page has not been cached yet, and your visit just got it cached. After reloading the page, unless there is a problem, the timestamp should appear.
Minified or combined files
If the Minify CSS files or Minify JavaScript files features are active, the URLs of the CSS and JavaScript files will include this part:
/wp-content/cache/min/
Like this:
<script data-minify="1" type="text/javascript" src="https://yoursite.com/wp-content/cache/min/1/wp-content/plugins/wt-smart-coupon-pro/blocks/build/gift-coupon/frontend.js?ver=1730295785" id="wt-sc-blocks-gift-coupon-frontend-js"></script>
 This means that WP Rocket’s minification is working; usually, the page would also be cached.
Meta tag
From the 3.17.2 version, WP Rocket adds a <meta> element to the markup of the page. This element contains information about the WP Rocket version used, and the optimizations running on the page.
<meta name="generator" content="WP Rocket 3.17.2" data-wpr-features="wpr_lazyload_css_bg_img wpr_delay_js wpr_defer_js wpr_minify_js wpr_lazyload_images wpr_lazyload_iframes wpr_oci wpr_image_dimensions wpr_minify_css wpr_desktop wpr_preload_links" />

This element is proof that WP Rocket has successfully processed the page.
Wappalyzer
Wappalyzer is a free service that lets you identify technology on websites.
You can install one of their browser extensions that will show you if WP Rocket is running on a website.
Go to Wappalyzer to install browser extension
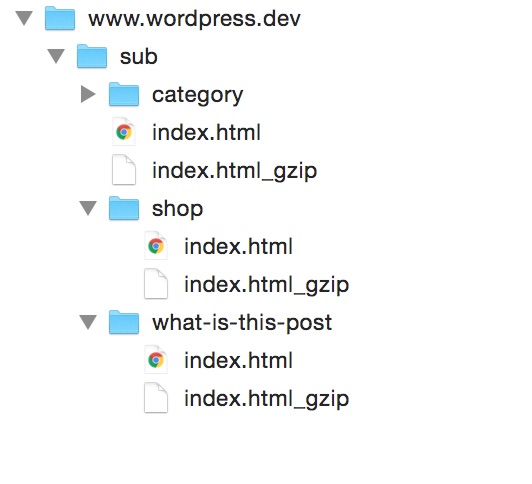
Cache folder on the server
Using either (S)FTP, or your web host’s file manager panel, you can visit the cache folder in your WordPress install directly, and make sure that cache files are generated correctly.
- Make sure you’re logged out, then visit several pages on your site, so they get cached.
- Access your WordPress file system and navigate to:
{your-wordpress-root-folder}
  ┗ wp-content
    ┗ cache
      ┗ wp-rocket
Inside of that folder, you should see a folder named like your domain. This is the folder where you should find cached .html and/or .html_gzip files, along with folders for each page on your site. These are the cache files.
It should look something like this (with www.wordpress.dev being our example site URL):
Caching doesn’t work, now what?
After using all these methods, if you determine that WP Rocket is NOT caching your site, here’s how to troubleshoot: